Wide Range Scalping Strategy: Levels, Midline & Execution
TL;DR. A wide range is a consolidation broad enough to trade inside: on BTC, 1% to 3% between the edges on the 15-minute chart, often lasting a full session. The wide range scalping strategy has three trades, not one: the fade at the edge, the reaction at the midline, and the break-and-retest of the midline. Because the stop is small relative to the range, the reward in R is large and fees are a small fraction of risk, which is the opposite of the narrow range. The trap is the same as in every range: the breakout that ends it, and the middle of the range where most of the losing trades are taken.
Prerequisites for this lesson: Range fade (identification, triggers, the exit rule), Narrow range scalping (the fee test and the dead zone), Support and resistance (why the midline is a weaker level than the edges). The trade sizes use 1R = $100 on a $10,000 account, maker fees 0.02%.
What makes a range wide
Width is measured against your stop, not against the chart. A range is wide when a stop placed just outside its boundary is a small fraction of the range height, say one tenth or less. On BTC at $100,000 that starts around 1% of height ($1,000) with a stop of $100 to $150, and a range of 2% to 3% is comfortable. Below that, the fees and the noise inside the range start to matter, and the narrow range rules apply instead.
A wide range usually forms after a large directional move. Price ran from $95,000 to $101,000 in a session, the run stopped, and now the market spends a day deciding whether the move was the start of something or the end of it. Buyers who missed the run defend the lows; sellers who think it went too far cap the highs; the middle is contested. On the 15-minute chart you see three or four touches of each edge with swings that reach most of the way across each time.
Two things change compared with a narrow range. First, the trip from one edge to the other takes an hour or more, so there is time to manage the trade in stages. Second, the midpoint of the range starts to behave as a level of its own. Traders who bought the low take profit there; traders who shorted the high cover there; the volume-weighted average price for the session often sits near it. That gives you a second reference line and two more trades.
The map: three trades in a wide range
Take a range with support at $98,800 and resistance at $101,200: $2,400 wide, 2.4%, midline at $100,000, formed on the 15-minute chart over a trading day.
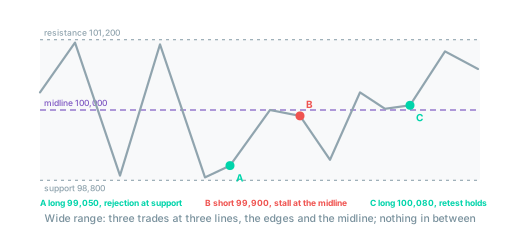
Trade A, the edge fade. Identical to the range fade entry: price reaches the edge, a rejection candle closes back inside, stop beyond the boundary and the wick. The difference is the target plan, which uses the width. First target the midline, second target just inside the far edge, remainder trailed.
Trade B, the midline reaction. Price rallies from support and stalls at the midline. The stall is visible as a bearish rejection candle on the 15-minute chart on falling volume, ideally with the CVD flattening while price still pushes. The trade is a short back towards support, with the stop above the midline reaction high. This is the weakest of the three trades because the midline has fewer resting orders than the edges. It is taken smaller, and only with a visible rejection.
Trade C, the midline break and retest. Price breaks through the midline decisively, with a full-bodied candle closing well beyond it, then pulls back to it and holds. The old ceiling in the middle of the range becomes the floor. The trade is in the direction of the break, targeting the far edge, with the stop below the retest low. It is the breakout and retest pattern applied inside a range, and it works for the same reason: the retest shows that the level is now being defended from the other side.
Trade A with numbers
Support at $98,800. Price drops to $98,850, prints a hammer on the 15-minute chart, and closes at $99,050. Entry on the close.
| Item | Value |
|---|---|
| Entry | $99,050 |
| Stop | $98,700 (below the range low and the wick; risk $350 per BTC, 0.35%) |
| Position for $100 risk | 0.286 BTC, notional $28,300 (2.8× on the account) |
| Maker fees, round trip | $11 (0.11R) |
| Target 1: midline $100,000 | +$950 per BTC, 2.7R, half the position |
| Target 2: $101,000, inside resistance | +$1,950, 5.6R, a quarter of the position |
| Remainder | trailed behind the 15-minute swing lows |
Compare the fee row with the narrow range trade: $11 against $33, 0.11R against 0.33R, for the same $100 of risk. The wider stop makes the position smaller, and the exchange charges on the position. Fees divided by stop distance is 0.04% ÷ 0.35% = 11%, half of what the range fade lesson called the danger zone. That ratio is the reason experienced scalpers prefer wide ranges on higher timeframes to tight ranges on the 1-minute chart, even though the tight ranges look like they offer more trades.
The target ladder
The three-part exit is the heart of the wide range trade, so here is what it pays under each outcome. Assume the trailed remainder, when it survives, exits at $100,800 (+$1,750, 5.0R).
| Outcome | Half at target 1 | Quarter at target 2 | Quarter trailed | Result |
|---|---|---|---|---|
| Both targets hit, trail exits at $100,800 | +1.35R | +1.4R | +1.25R | +4.0R |
| Target 1 hit, rest stopped at breakeven | +1.35R | 0 | 0 | +1.35R |
| Stopped before target 1 | −1R | −1R |
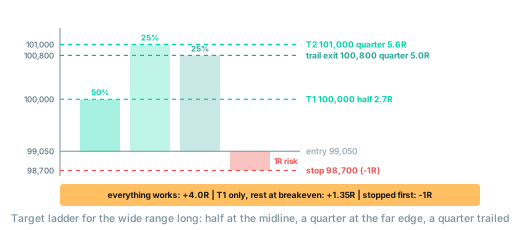
The ladder is what makes a 50% win rate pay. If half the trades are stopped at −1R, a quarter reach target 1 only (+1.35R) and a quarter run the full ladder (+4.0R), the average is +0.84R per trade before the $11 fee. Those proportions are an illustration, not a statistic; your own numbers come from your playbook records. The point is structural: a small stop against a wide range gives room for a few large winners to carry many small losers, which the narrow range can never do.
Trade B and trade C with numbers
Trade B, the midline short. The rally from $99,050 reaches $100,000 and stalls. A shooting star closes at $99,900 on volume lower than the previous three candles.
- Entry $99,900, stop $100,150 (risk $250), target $99,100 just above support (+$800, 3.2R).
- Position for $100 risk: 0.4 BTC, $40,000 notional, maker fees $16 (0.16R).
Take it at half the usual size. The midline is respected often enough to be worth a trade, and broken often enough that a full-size position there will hurt when it fails. If you are still holding the remainder of trade A when price reaches the midline, trade B is not a new position; it is the reason you took half off at target 1.
Trade C, the midline break and retest. Later in the session a 15-minute candle closes at $100,300 with volume three times the average. Two candles later price pulls back to $100,020, holds, and the next candle closes at $100,080.
- Entry $100,080, stop $99,850 (below the retest low; risk $230), target $101,000 (+$920, 4.0R).
- Position for $100 risk: 0.435 BTC, $43,500 notional, maker fees $17 (0.17R).
Trade C has the best record of the three in a wide range, because the break of the midline puts the traders who shorted the middle on the wrong side, and their covering is the fuel for the move to the far edge. If the retest does not hold and price closes back below the midline, the break has failed and the range is likely to keep oscillating; you are out at the stop and back to waiting for the edge.
The middle of the range
Between the midline and the edges is where the losing trades live. Price pauses halfway up, forms a small consolidation for twenty minutes, and the temptation is to trade it like a narrow range. Do not. A pause in the middle of a wide range has no level under it and no level over it; both sides of the trade have a stop in open air and a target that is another pause. The only trades in a wide range happen at the three lines: the two edges and the midline. Everything else is noise, and the narrow range lesson already showed what noise costs after fees.
The traps
- Trading the third touch of the edge as if it were the first. Each touch consumes some of the resting orders that make the level hold. By the fourth or fifth touch in a session the edge is weaker, not stronger, and a close through it is more likely. Reduce size at each successive touch or stop trading that edge.
- Holding the remainder through the far edge. The trailed quarter is there to catch a breakout in your direction. If the far edge holds and price turns, the trail exits it. If you move the trail away to "give it room", you have converted a range trade into a bet on a breakout, which is a different trade with a different plan.
- Shorting the midline without a rejection. A line at $100,000 is not a reason to short. A rejection candle at $100,000 on falling volume is. Without it, trade B is a guess in the middle of the range.
- Fading the breakout. When a candle closes outside the range on volume, the range is over. The range fade lesson's exit rule applies with no exceptions; the width of a wide range makes the breakout move correspondingly large.
- Forgetting the higher timeframe. A wide range on the 15-minute chart sits inside a trend on the 4-hour chart. Fading the edge that points against that trend has a lower win rate; the trend identification lesson covers how to read it.
Checklist for a wide range
- Is the range at least 1% high, with a stop just outside the edge that is one tenth of the height or less?
- Have both edges been touched at least three times and rejected?
- Where is the midline, and does the session VWAP agree with it?
- Which of the three trades is this: edge, midline reaction, or midline break and retest?
- Is the trigger a closed candle at one of the three lines, not a pause in between?
- Is the target ladder written down: half at the midline, a quarter at the far edge, a quarter trailed?
- What ends the trade: a close outside the range, and nothing else?
Where to go from here
The range lessons have used the word "sweep" several times without explaining it. The next lesson does: why stops cluster beyond obvious levels, what happens when they are triggered, and how to tell a sweep from a real breakout while it is happening.
- Stop hunts and liquidity sweeps: the mechanism behind the wick through the level.
Related guides:
- Range fade: the base method, the fee test and the exit rule.
- Narrow range scalping: the opposite environment and why it is mostly a no-trade zone.
- Breakout and retest: the pattern trade C applies inside the range.
- VWAP for scalping: the session average that often marks the midline.
- Win rate vs risk/reward: why a target ladder makes a 50% win rate profitable.
- Crypto scalping strategies: the full strategies track.
- Glossary: range, support, resistance, risk/reward ratio.
This article is educational content, not investment advice. Trading derivatives carries substantial risk, including total loss of capital. See disclaimer.