Two-Candlestick Patterns: Engulfing, Harami & Piercing Line
TL;DR. Two-candlestick patterns are more reliable than single candles because the second candle confirms the reversal inside the pattern itself. The engulfing patterns are the strongest of the group; dark cloud cover and piercing line are next; harami and tweezers are warnings rather than signals. All of them apply at the end of a move, at a level, and none of them survives being taken in the middle of a range. The limitation is the same as for every candlestick pattern: the shape is easy to spot and the location is what decides whether it means anything.
Prerequisites for this lesson: Single candlestick patterns (the rejection logic and the confirmation rule), Support and resistance. Lesson 3 of the strategies track.
Why two candles are stronger than one
A single candle shows one period's contest. A two-candle pattern shows the contest extended over two periods, with the second period's result reversing the first. That makes the signal structurally more convincing: the confirmation that a single-candle pattern has to wait for is already part of the pattern.
The general rule: the stronger the first candle (the setup) and the more decisively the second candle reverses it (the trigger), the more the pattern means.
Bullish Engulfing

Appears: at the end of a decline
Signal: strong bullish reversal
Shape: a bearish candle followed by a bullish candle whose body completely covers the first candle's body
The bullish engulfing pattern is one of the most reliable two-candle reversals. It forms when:
- A bearish candle continues the decline; sellers are still in control.
- The next candle opens below the first candle's close and rallies to close above the first candle's open.
The second body has swallowed the first. Sellers dominated one period, buyers dominated the next more decisively, covering the whole of the previous move.
Requirements:
- A clear decline before it, at least three to five bearish candles.
- The engulfing body covers the entire body of the first candle, not just part of it.
- Volume on the engulfing candle higher than on the first, ideally.
Nison adds two conditions that increase its weight: a very small first body followed by a very long second body (the old move losing force, the new one gaining it), and a second candle that engulfs more than one prior body.
In scalping: a bullish engulfing candle at known support, or at a sweep of a recent low, is a high-quality trigger. Entry above the engulfing candle's high, stop below the pattern's low.
Bearish Engulfing
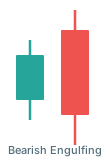
Appears: at the end of a rally
Signal: strong bearish reversal
Shape: a bullish candle followed by a bearish candle whose body completely covers the first candle's body
The mirror. After a rally, a bullish candle is followed by a bearish one that opens above the first candle's close and closes below its open. Buyers controlled the first period; sellers overwhelmed them in the second and took back more than the first period gained.
In scalping: a bearish engulfing candle at known resistance, at a sweep of a recent high, or after an extended rally. Short entry below the engulfing candle's low, stop above the high.
Dark Cloud Cover

Appears: at the end of a rally
Signal: bearish reversal
Shape: a bullish candle, then a candle that opens above the first candle's high and closes below the midpoint of its body
Formation:
- A strong bullish candle continues the rally.
- The next candle opens above the first candle's high. In 24/7 crypto markets the gap is usually small, a wick opening above the previous close rather than a visible space.
- The second candle sells off and closes below the midpoint of the first candle's body.
The penetration is the point. A second candle that closes below the first candle's top but not below its midpoint is a weaker signal, and a close in the lower half of the first body is the classical requirement.
Stronger when: the close is well below the midpoint, the second candle's volume is heavier than the first, and the pattern forms at a level.
Piercing Line
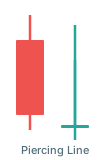
Appears: at the end of a decline
Signal: bullish reversal
Shape: a bearish candle, then a candle that opens below the first candle's low and closes above the midpoint of its body
The bullish counterpart of dark cloud cover. After a bearish candle extends the decline:
- The second candle opens below the first candle's low.
- Buyers drive it up to close above the midpoint of the first candle's body.
Sellers had the market at the second candle's open; buyers absorbed them and pushed back into the prior bearish body. Minimum penetration: above the 50% level of the first body. Below that, the pattern is one of the weaker "neck" variants and should not be traded as a piercing line.
Bullish Harami
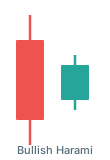
Appears: at the end of a decline
Signal: possible bullish reversal, weaker than engulfing
Shape: a large bearish candle, then a small bullish candle contained entirely within the first candle's body
"Harami" is Japanese for pregnant: the large first candle is the mother and the small second candle is the child inside it.
After a strong bearish candle, the second period barely moves and stays inside the first body. The selling has paused. Sellers drove the large candle; the following period produced nothing.
The distinction from engulfing: the harami is a warning of a possible reversal, not a reversal. The decline has stalled but has not been overcome. Confirmation from the following candles is essential.
Harami cross: if the second candle is a doji, the pattern is a harami cross, which carries more weight than the ordinary harami.
Bearish Harami
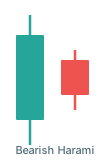
Appears: at the end of a rally
Signal: possible bearish reversal
Shape: a large bullish candle, then a small bearish candle contained within the first candle's body
The mirror. A large bullish candle is followed by a small bearish one inside its body. Buyers produced a large candle and then could not follow through. Again a warning: it needs a level and confirmation before it is anything else.
Tweezers

Tweezers Top
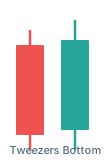
Tweezers Bottom
Tweezers form when two consecutive candles share the same high (tweezers top) or the same low (tweezers bottom). The same extreme was tested twice and rejected twice, which marks the level as resistance or support.
Tweezers top: two candles with matching highs at the top of a rally. Tweezers bottom: two candles with matching lows at the bottom of a decline. On crypto's fine tick sizes "matching" means within a few ticks, not to the tick.
Comparing pattern strength
From strongest to weakest, as a rough guide:
| Pattern | Signal strength | Confirmation needed |
|---|---|---|
| Engulfing (bullish or bearish) | Strong | Helpful, less critical |
| Dark cloud cover | Moderate to strong | Yes |
| Piercing line | Moderate to strong | Yes |
| Harami cross | Moderate | Yes |
| Tweezers | Moderate | Yes |
| Harami | Weak | Essential |
These are guidelines. Context can make a weak pattern significant and a strong pattern meaningless, and the context lesson is where that is settled. Whatever the pattern, the stop goes beyond the pattern's extreme, and the risk management lesson sizes the trade from there.
Where to go from here
Two candles show a reversal and its confirmation. Three-candle patterns add the transition between them.
- Three-candle patterns: morning star, evening star, three white soldiers, three black crows.
Related guides:
- Single-candle patterns: hammer, doji, shooting star.
- Candlestick context for scalping: the qualification every pattern needs.
- Stop hunts and liquidity sweeps: why an engulfing candle at a swept low is a strong trigger.
- Crypto scalping strategies: the full strategies track.
- Glossary: support, resistance, liquidity sweep.
This article is educational content, not investment advice. Trading derivatives carries substantial risk, including total loss of capital. See disclaimer.