Crypto Range Breakout Strategy: Confirmation, Entry & Stop
TL;DR. The range breakout strategy enters in the direction of a move that leaves a consolidation, on the momentum of the breakout itself rather than on a later retest. It works when the breakout is strong: a full-bodied candle closing well outside the range on volume several times the average, after a compression. Most pierces of a range edge fail, so the confirmation rules are the strategy; without them you are buying sweeps. The stop goes back inside the range, the first target is the height of the range projected from the breakout, and the exit on failure is a close back inside, not the stop. This lesson gives the entry with numbers, the honest comparison with the retest entry, and the failure that costs breakout traders the most.
Prerequisites for this lesson: Stop hunts and liquidity sweeps (the tells that separate a sweep from a breakout), Narrow range scalping (compression before expansion), Trade execution (market orders, taker fees, slippage on a fast candle). Sizing: 1R = $100 on a $10,000 account; fees maker 0.02%, taker 0.05%.
What a breakout is and why most of them fail
A range holds because resting orders at its edges absorb the pushes against them. A breakout is the moment the push is larger than the absorption: the resting orders at the edge are consumed, the stops beyond it fire, and price moves into the thin part of the book where there is nothing to stop it. The stop hunt lesson described exactly this sequence and then showed that it usually reverses. The difference between a sweep and a breakout is not how the move starts but whether genuine buyers (or sellers) arrive to take the other side of the forced orders once they are exhausted.
Al Brooks is blunt about the base rate: most breakout attempts from a trading range fail, and the range pulls price back to its middle. He is equally clear that when a breakout is strong, the market usually follows through for many bars. Both statements are true at once, and together they define the trade. You do not trade breakouts. You trade strong breakouts, and you let the rest go.
What a strong breakout looks like
Four conditions, all of them visible on the chart while the breakout is happening:
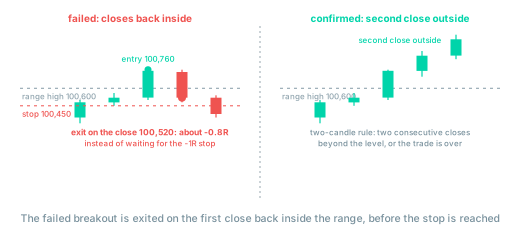
- A close outside the range, not a pierce. On the 5-minute chart, the breakout candle closes beyond the edge. On the 1-minute chart, two consecutive candles close beyond it: the two-candle rule. A wick through the edge that closes back inside is the sweep from the previous lessons.
- A full body. The breakout candle closes in the top third of its own range (for an upside break). A candle that spikes to $100,900 and closes at $100,650 has already been sold; the long upper wick is the sweep leaving its signature.
- Volume several times the average. Two to three times the average of the previous twenty candles is the working threshold. Brooks notes that volume is not a reliable filter on its own, and he is right; a breakout on ten times average volume can still fail. But a breakout on average volume almost always does, because nothing new has entered the market.
- Compression before it. The best breakouts come from narrow ranges, the contraction that Crabel's work showed tends to precede expansion. A range that has been widening for an hour and then breaks is more likely to be another swing than a new trend.
Context helps and can be added to the playbook later: a breakout in the direction of the 1-hour trend, a breakout after a period of falling open interest that suddenly rises, a breakout while the market leader is moving the same way. None of these replace the four conditions above.
The momentum entry with numbers
Range on the 5-minute chart: low $99,400, high $100,600, height $1,200 (1.2%), two hours of narrowing swings. A candle closes at $100,750 with a body from $100,520 to $100,750, no upper wick to speak of, on volume three times the twenty-candle average.
| Item | Value |
|---|---|
| Entry (market order on the close) | $100,760 |
| Stop (back inside the range, below the breakout candle's midpoint) | $100,450 (risk $310, 0.31%) |
| Position for $100 risk | 0.323 BTC, notional $32,500 |
| Fees | taker entry $16 + maker exit $7 = $23 (0.23R) |
| Target 1: measured move, range height projected from the high | $100,600 + $1,200 = $101,800: +$1,040, 3.4R |
| Breakeven win rate at 3.4R | 23% |
| Result if stopped | −1R, −1.3R with both legs at taker |
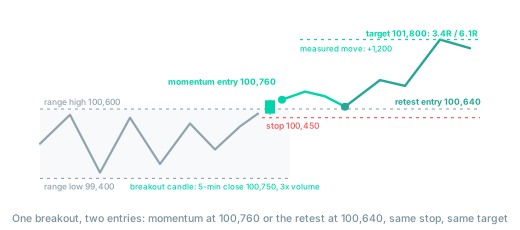
The measured move is the first target because it is the distance the market has already shown it can travel: the compression stored a range's worth of energy, and the breakout tends to release about that much. It is a calibration, not a promise. The second target is the next level on the 1-hour chart, and the remainder can be trailed behind the 5-minute swing lows as the exit strategy lesson describes.
The stop is inside the range on purpose. A breakout that has price back below the midpoint of the breakout candle has failed by definition; the buyers who lifted it have been sold to. Placing the stop just below the range high, at $100,590, would be tighter but it is in the band where the first pullback of a real breakout normally reaches, so it is hit on winning trades as well as losing ones.
Momentum entry or retest entry
The breakout and retest lesson enters the same breakout later, when price comes back to the broken level and holds. Here is the honest comparison on this trade:
| Momentum entry | Retest entry | |
|---|---|---|
| Entry | $100,760 | $100,640 |
| Stop | $100,450 | $100,450 |
| Risk | $310 | $190 |
| Reward to $101,800 | $1,040, 3.4R | $1,160, 6.1R |
| Breakeven win rate | 23% | 14% |
| Fees | taker in, maker out: 0.23R | maker both legs on a larger position: 0.21R |
| What can go wrong | The breakout is a sweep; you are long at the top of the spike | The retest never comes and the trade is missed; or the retest is the start of the failure |
On almost every measure that can be written down, the retest entry is better: smaller risk, more R, the same fee bill on a larger position, and the extra evidence that the level is being defended from the new side. Brooks's advice that it is usually better to buy the pullback than the breakout rests on exactly this arithmetic. The case for the momentum entry is the one thing the table cannot show: strong breakouts sometimes do not pull back, and a trader who only takes retests misses them. The practical answer is to take the momentum entry only when all four strength conditions are met, at reduced size, and to add on the retest if it comes. A breakout that meets two of the four conditions is a retest-only trade, or no trade.
The failure and the exit
Breakouts fail in two ways, and the strategy handles them differently.
The immediate failure. The breakout candle closes at $100,750, you enter, and the next candle closes at $100,520, back inside the range. The two-candle rule has been violated on the second candle. Exit on that close, at market, at about $100,520: a loss of $240 per BTC, about 0.8R plus fees, before the stop at $100,450 is reached. Waiting for the stop costs an extra 0.2R and, worse, trains you to wait. Brooks describes the sequence breakout, failed breakout, then either reversal or breakout pullback as the most common pattern in price action; the close back inside is the moment the first branch is taken, and it is the exit signal.
The slow failure. The breakout holds for three or four candles, drifts sideways just above the range, then leaks back into it without a decisive candle. Volume fades. The trade is not stopped but it is not working, and every candle inside the old range is evidence that the pull of the range has won. The rule is the same as for the reversal trade: if price has made no progress after ten candles, exit flat. A breakout with follow-through shows it within a few candles or not at all.
Both failures often turn into the opposite trade. A breakout that closes back inside is a stop-hunt reversal setup in the other direction, with the traders who bought the breakout as its fuel. Being able to switch sides on a failed breakout, rather than doubling down on the original view, is what separates a breakout trader from a breakout victim.
The traps
- Entering on the pierce. The candle is still open, it looks strong, and by the time it closes it has a long upper wick. The close is the confirmation; before it there is no breakout, only a push.
- Chasing the second candle. If the confirmation comes and price has already run $400 past the edge, the stop back inside the range is now $700 away and the measured-move target is $600 away. The trade's equation has inverted. Let it go and wait for the retest.
- Market orders on a thin book. The moment of the breakout is when the book above the level is emptiest. A market order for a large size fills through several levels; on smaller coins the slippage can exceed the intended stop distance. Size down or use a limit order slightly above the close and accept a miss.
- The breakeven stop after one candle. Moving the stop to entry as soon as the trade shows a profit puts it exactly where the first normal pullback reaches. The exit strategy lesson shows what that costs over a sample of trades.
- Averaging into the failure. The breakout fails, price is back inside the range, and the trade is added to at $100,400 "for a better average". The range that pulled price back is now pulling it towards its middle, and the position has doubled at the wrong time. The common mistakes lesson has the arithmetic of what this does to an account.
Checklist before a momentum breakout entry
- Did the candle close outside the range on the 5-minute chart, or two consecutive candles on the 1-minute chart?
- Did it close in the top third of its own range, without a long wick against the move?
- Was volume at least two to three times the twenty-candle average?
- Was the range compressing before the break?
- Is the stop back inside the range, and is it 1R or less at the intended size?
- Is target 1 the measured move, and is it at least 2R from the entry?
- What is the exit if the next candle closes back inside? (At that close, at market.)
Where to go from here
The momentum entry is the earlier, riskier way into a breakout. The next lesson is the later, cleaner way, and the two are meant to be used together.
- Breakout and retest: waiting for the return to the broken level, the retest that holds, and the entry with the smaller stop.
Related guides:
- Stop hunts and liquidity sweeps: why most pierces fail and how to tell early.
- Stop-hunt reversal: the trade a failed breakout becomes.
- Narrow range scalping: the compression that produces the best breakouts.
- Range breakout mechanics: the order-book view of what happens at the edge.
- Position sizing and risk management: why the momentum entry is taken at reduced size.
- Crypto scalping strategies: the full strategies track.
- Glossary: breakout, range, slippage, taker.
This article is educational content, not investment advice. Trading derivatives carries substantial risk, including total loss of capital. See disclaimer.