Breakout and Retest Strategy for Crypto Trading
TL;DR. A breakout is a decisive close beyond a significant support or resistance level. A retest is the return of price to that level from the other side, where old resistance is expected to act as support (or the reverse). The breakout and retest strategy enters on the retest, not on the break, because the break only shows that a level was overcome while the retest shows whether the new side is defending it. The cost is that some breakouts never come back and the trade is missed. The benefit is a smaller stop, more R, and one more piece of evidence before your money is at risk.
Prerequisites for this lesson: Range breakout (the strength conditions and the momentum entry this lesson is compared with), Stop hunts and liquidity sweeps (why the first candle of a break proves nothing), Single candlestick patterns (the rejection candles that confirm a retest). The numbers reuse the range from the previous lesson.
Why not enter the break itself
The reaction to a level giving way is familiar: it feels like a clear signal, the move is already happening, and missing it feels expensive. That impulse causes more losses than almost any other decision in scalping.
The problem is not that breakouts are rare. It is that the first candle of a genuine breakout and the first candle of a sweep look the same. Price pushing through resistance on a large candle can be:
- a real breakout driven by new buying that will persist, or
- a stop hunt: price spiked into the stops clustered above the level, the forced buying ran out, and the move is about to reverse.
The difference only becomes visible in what happens next. Entering at the initial break commits you before that evidence exists. Traders who buy every break pay for the real ones and the fake ones alike, and the previous lesson's rule about strength conditions is the only defence they have. The retest trader waits for a second, independent piece of evidence.
The five phases
A breakout and retest moves through five phases. Knowing which one you are in is most of the skill.
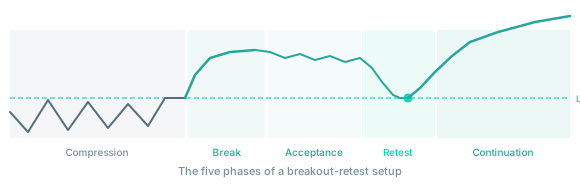
Phase 1, compression. Price oscillates in a range, testing the boundary repeatedly without breaking it. Volume declines as the range narrows. The narrow range lesson describes this phase; the tighter and longer it is, the more the eventual break tends to travel.
Phase 2, the break. A candle closes decisively beyond the level. Closes, not touches: a wick that punches through resistance and comes back is a test, and possibly a sweep. Volume on the break should be well above the recent average.
Phase 3, acceptance. Price holds beyond the level for several candles instead of snapping back. The market is adjusting its idea of fair value: shorts are covering, new longs are entering at the higher level. Two or three candles holding above are enough. Without any acceptance there is no breakout to retest.
Phase 4, the retest. Price pulls back to the level it broke. The old resistance should now attract buyers. How price behaves here is the decision point and the entry.
Phase 5, continuation. If the retest holds, price resumes in the breakout direction, usually with momentum. The measured move gives the first target.
What a valid retest looks like
The pullback. A healthy retest is a gradual drift back to the level: momentum fading, volume falling, pullback candles getting smaller. The sellers driving it are taking profit on the breakout, not attacking it. A fast, high-volume return to the level is a warning that the break is being reversed rather than retested.
The reaction at the level. Price reaching the level and bouncing at once, with a rejection candle and a pickup in buying volume, is the confirmation. Price reaching the level and grinding through it, or pausing and then continuing lower, is the setup failing.
The candle. A hammer, a bullish engulfing candle or a pin bar at the level reinforces the signal. None of them is required; any visible sign that buyers are defending the level will do, and the candlestick context lesson explains why the location matters more than the pattern.
How far through the level price may go. A level is a zone, not a number. A wick below the old resistance that closes back above it is consistent with the setup. A close clearly back inside the old range is not.
The entry with numbers
Same breakout as the range breakout lesson: range $99,400 to $100,600, a 5-minute close at $100,750 on three times average volume. Two candles hold above the range high. The third pulls back to $100,610, prints a small hammer whose wick touches $100,580, and closes at $100,640.
| Item | Value |
|---|---|
| Entry (close of the retest candle) | $100,640 |
| Stop (below the retest low and back inside the range) | $100,450 (risk $190, 0.19%) |
| Position for $100 risk | 0.526 BTC, notional $52,900 |
| Maker fees, round trip | $21 (0.21R) |
| Target 1: measured move | $101,800: +$1,160, 6.1R |
| Breakeven win rate at 6.1R | 14% |
| The momentum entry on the same breakout, for comparison | entry $100,760, risk $310, 3.4R to the same target |
The retest entry risks $120 less per BTC than the momentum entry and targets the same price. That is the whole argument for waiting. The exit strategy lesson covers how the position is managed once target 1 is in view.
Two outcomes at the retest
The retest holds. Enter in the breakout direction with the stop below the retest low. A close back inside the old range means the premise is wrong and the position is closed, at the stop or before it. First target: the measured move. Second target: the next significant level on the higher timeframe.
The level is recaptured. Price closes back inside the old range. The breakout has failed, the traders who bought it are trapped, and this is now the stop-hunt reversal setup in the other direction. A failed retest is not a loss of information; it tells you the range is still in charge, and it often hands you the next trade.
Target and stop placement
Stop. Below the retest low for a bullish setup, above the retest high for a bearish one. If price returns inside the old range, the premise of the trade is gone; exit cleanly. The stop needs enough room for the normal noise of the zone and no more than that, or the R on the target shrinks.
First target, the measured move. Take the height of the range before the break and project it from the breakout level. It is a calibration drawn from the energy the compression stored, not a guarantee.
Second target, the next level. Beyond the measured move, the next meaningful resistance on the 1-hour chart. That is where the second partial exit goes and where the trailing stop tightens.
What kills the setup
- News during the setup. A macro release, an exchange incident, a spike in DVOL: any of these overrides the level for a while. Manage the position as a news trade, not a technical one.
- Low volume through the whole sequence. A break on below-average volume followed by a retest on even less is a setup with no participation behind it.
- The higher timeframe against you. A 5-minute breakout into a 1-hour resistance zone is fighting a larger level. Alignment is not required, but misalignment is a headwind that belongs in your size decision.
- Repeated tests. Break, retest, bounce, retest, bounce, retest again. Each visit consumes the resting orders that make the level hold; by the third retest the level is weaker, not stronger.
- The retest that never comes. Sometimes the strong breakout just goes. The retest trader misses it. That is the price of the smaller stop, and it is worth paying; a strategy that must catch every move will catch every sweep too.
Checklist before a retest entry
- Did the break close beyond the level on above-average volume?
- Did price hold beyond the level for at least two candles before pulling back?
- Was the pullback gradual, on falling volume?
- Did a rejection candle close at the level, back on the breakout side?
- Is the stop below the retest low and back inside the old range, at 1R or less?
- Is target 1 the measured move, at least 3R from this entry?
- If a candle closes back inside the old range, do I know the reversal setup?
Where to go from here
Ranges, sweeps and breakouts cover the sideways market and the moment it ends. The next lesson covers what comes after a successful breakout: a trend, and the pullback entries that let you join it without chasing.
- Trend scalping with EMA pullbacks: joining a trend on the pullback to the moving average.
Related guides:
- Range breakout: the momentum entry and the strength conditions.
- Stop-hunt reversal: the trade a failed retest becomes.
- Support and resistance: why the level is a zone and how wide.
- Open interest: OI behaviour during a breakout as context.
- Position sizing and risk management: sizing for a $190 stop.
- Crypto scalping strategies: the full strategies track.
- Glossary: breakout, support, resistance.
This article is educational content, not investment advice. Trading derivatives carries substantial risk, including total loss of capital. See disclaimer.