Crypto Position Sizing & Risk Management for Scalping
TL;DR. Most accounts end because the positions were too large, not because the setups were wrong. Crypto position sizing and risk management come down to one formula applied on every trade: decide the dollars you will lose if the stop is hit, divide by the distance to the stop, and that is the position size. The risk amount is 1% to 2% of the account, the stop comes from the chart or from volatility, and the size follows from both. The limitation is that the formula protects you only if the stop is honoured; a stop that is moved is not a stop, and the formula was built on a number that no longer exists.
Prerequisites for this lesson: Crypto leverage (liquidation distance, margin modes), Crypto order types (stop-market, reduce-only), Support and resistance (where a stop belongs). Lesson 6 of the basics section.
Why sizing matters more than entries
A random entry with disciplined sizing and exits beats a good entry with poor sizing over any sample large enough to count. With random entries and an average win 1.5 times the average loss, a 50% win rate is profitable from the size asymmetry alone. A trader who calls direction correctly 60% of the time and lets the losers run while cutting the winners still loses.
Position sizing is what creates the asymmetry. It is not exciting and it does not feel like skill. It is the foundation the rest of the site rests on, which is why every worked trade in the strategies track is sized this way.
The formula
Position size = Risk amount ÷ Stop distance
- Risk amount: the dollars you accept losing on this trade.
- Stop distance: the dollars per unit between the entry and the stop.
Example: risk $100; entry $100,000; stop $99,600, a $400 distance per BTC. Position = $100 ÷ $400 = 0.25 BTC, a notional of $25,000.
The formula works regardless of leverage, account size or instrument, and it forces the correct order: stop first, size second. A trader who picks the size first and then looks for a stop that "fits" has the arithmetic backwards.
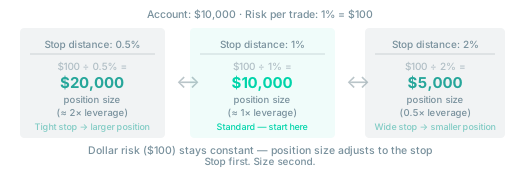
The units matter. On a $10,000 account, 1R = $100 throughout this site: a trade that makes 2R made $200, a trade that loses 1R lost $100, and every strategy lesson reports its results in R so that the sizing and the setup can be judged separately.
The 1% to 2% rule
The risk amount is a fixed fraction of the account, 1% to 2% per trade:
- $1,000 account: $10 per trade
- $5,000 account: $50
- $10,000 account: $100
It sounds small on purpose. At 1% risk it takes about 70 consecutive losses to halve the account (0.99 to the 69th power is 0.50), which does not happen to any strategy with an edge. At 10% risk, seven consecutive losses, which every strategy produces sooner or later, take away more than half of it (0.9 to the 7th is 0.48). The risk of ruin lesson draws the whole curve; the short version is that 1% keeps you on the flat part of it.
The 1% rule is not caution for its own sake. It is what keeps you trading long enough to get good. A trader who survives twelve months at 1% with a record to study is in a different position from one who doubled the account in month one and lost it in month two. Experienced traders sometimes go to 2% or 3% on setups with a demonstrated edge, after consistency at 1%, never before.
Portfolio heat
Scalpers sometimes hold several positions at once. The 1% rule is per trade; the total risk across open positions is the portfolio heat, and it needs its own cap. A working limit is 4% to 6% of the account: if every open stop fired at once, the loss would be no more than that.
At 1% per trade that allows four to six concurrent positions, which is plenty for scalping. Beyond it, the odds that one sharp move hits several positions together rise fast, because in a crypto sell-off everything is correlated and the market correlation lesson explains why.
Where the stop goes
Having a stop is necessary; where it goes decides whether it is hit by the market being wrong or by noise.
Chart stops, the default. The stop sits where the trade's premise fails. Long because price held above support: the stop goes beyond the support zone and beyond the wick that tested it. If price closes through the zone, the reason for the trade is gone and the exit is correct whatever it costs.
Volatility stops. The ATR measures how far price typically moves per candle. A stop at 1 to 2 ATR from the entry is calibrated to the instrument's current noise rather than to a round number. On a 1-minute BTC chart the 14-period ATR is often $80 to $150; with $100 of risk and an ATR of $100, a 1-ATR stop gives a position of 1 BTC, and the size scales down automatically when volatility rises.
Not at the obvious price. Stops at round numbers and exactly at the previous low join a cluster that price visits regularly, for the reasons in how prices move and the stop hunt lesson. A few ticks beyond the structural level, or beyond the typical sweep distance, keeps the stop out of the band.
In the book, not in your head. A stop-market order, reduce-only, placed the moment the entry fills. A mental stop is a decision to be made under pressure, and those decisions go one way.
The stop is a promise
The most common way traders break their own system: price approaches the stop, it looks as if it might turn, the stop is moved to give the trade room. Then moved again. The exit, when it comes, is three times the planned loss, and the position size was calculated for the original number.
A stop placed at entry is binding. Moving it further from the entry is never allowed. Moving it towards the entry after the trade has gone your way is a separate decision, and the exit strategy lesson explains why even that is done to a level, not to breakeven. A trader who keeps moving stops "because I believe in the trade" has an entry problem: an entry worth holding through a full breach of the stop level was placed in the wrong spot.
Cutting losses before the stop
When a scalp is not doing what it was supposed to do within the expected time, closing it before the stop is often right. A long that was supposed to move within two or three minutes and is flat after five has failed even though the stop has not fired. The capital and the attention belong to the next setup.
This is the time stop, and the exit strategy lesson formalises it. Experienced scalpers close a fair share of their trades this way, for less than the planned loss, which lowers the average loss and raises the expectancy without touching the entries.
Sizing down when conditions change
The formula gives one size per trade. Conditions vary and the risk amount should reflect it.
Reduce the risk amount when:
- You are on a losing streak of three or more. The strategy may be fine; your decisions under the streak are not.
- Volatility has jumped (DVOL sharply higher). The stop needs to be wider, so the same dollar risk means a smaller position.
- Liquidity is thin (off-hours, holidays). Slippage on the exit is larger.
Do not increase it because you are on a winning streak or because the setup "feels" strong. Size changes follow the record over a large sample, which the playbook lesson describes, not the last five trades.
Leverage is a separate decision
The formula gives the position size in BTC. Whether you hold 0.25 BTC at 3× or at 10× changes the margin you post and the liquidation distance; it does not change the risk, because the stop decides the exit, not the liquidation price. Leverage matters for the buffer between the stop and the liquidation, and the leverage lesson sets the rule: liquidation at least 20% to 30% further away than the stop.
Sizing checklist
- Where is the stop, from the chart or from the ATR, and is it beyond the obvious price?
- What is the risk amount, and is it 1% to 2% of the account?
- Position = risk ÷ stop distance. What is the notional, and what are the fees on it in R?
- Is the stop in the book, stop-market, reduce-only?
- What is the total heat with this position open?
- Is the liquidation price at least 20% to 30% further from the entry than the stop?
Where to go from here
You can now size a trade so that a loss is a known number. The next lesson explains why a strategy's win rate says almost nothing on its own, and how the size of the wins relative to that number decides whether it makes money.
- Win rate vs risk/reward: the breakeven win rate for any target, and why beginners drift towards the wrong side of it.
Related guides:
- Crypto leverage: how leverage and liquidation interact with the stop.
- Crypto order types: stop-market versus stop-limit, reduce-only.
- ATR: the volatility measure for stop distance.
- Risk of ruin: the curve that the 1% rule keeps you on the flat part of.
- Trade exit strategy: time stops and what to do with the stop after a trade works.
- Crypto scalping basics: the section hub.
- Glossary: position sizing, portfolio heat, stop-loss, ATR.
This article is educational content, not investment advice. Trading derivatives carries substantial risk, including total loss of capital. See disclaimer.