Stop-Hunt Reversal Strategy for Crypto Scalping
TL;DR. The stop-hunt reversal strategy shorts (or buys) the reclaim after a liquidity sweep: price spikes through a level, triggers the stops beyond it, fails to hold, and closes back inside. The entry is the close of the reclaim candle, the stop sits above the sweep high, and the targets are the middle and the far side of the range the sweep came from. The reversal has fuel because the traders who bought the spike are trapped and have to sell. The trap for you is entering before the reclaim, or being stopped by a second, higher sweep before the reversal starts. This lesson gives the trade with numbers, the three entry styles, what open interest can and cannot confirm, and the failure modes.
Prerequisites for this lesson: Stop hunts and liquidity sweeps (the mechanism and the sweep-or-breakout tells), Range fade (targets inside a range, the exit rule), Open interest (what a change in OI measures). Sizing follows position sizing and risk management: 1R = $100 on a $10,000 account.
The setup
The previous lesson ended with the moment that matters: the candle after the pierce closes back inside the level. Everything in this lesson follows from that candle.
Take the range from the earlier lessons, support at $98,800 and resistance at $100,000. Price has been in it for most of the session. Then:
- A 1-minute candle spikes through $100,000 to $100,180 on the heaviest volume of the hour. Stops above the level fire, breakout buyers join, a few leveraged shorts are liquidated.
- The spike stalls. The next candle opens near $100,120, trades down through $100,000 and closes at $99,950, back inside the range, on volume half that of the spike.
- That close is the trigger. Price has been offered above the level and refused. The traders who bought between $100,050 and $100,180 are now holding longs above a level that is closing under them.
The reversal trade shorts that situation. The fuel is not a prediction about where price wants to go; it is the known position of a known group of traders who are wrong and will have to act.
The trade with numbers
| Item | Value |
|---|---|
| Entry (close of the reclaim candle) | $99,950 |
| Stop (above the sweep high with a buffer) | $100,230 (risk $280 per BTC, 0.28%) |
| Position for $100 risk | 0.357 BTC, notional $35,700 (3.6× on the account) |
| Maker fees, round trip | $14 (0.14R); taker would be $36 (0.36R) |
| Target 1: middle of the range, half the position | $99,400: +$550, 2.0R |
| Target 2: the range low, the other half | $98,800: +$1,150, 4.1R |
| Result if both targets hit | 0.5 × 2.0R + 0.5 × 4.1R = +3.0R gross, +2.9R net |
| Result if stopped | −1R, −1.14R net |
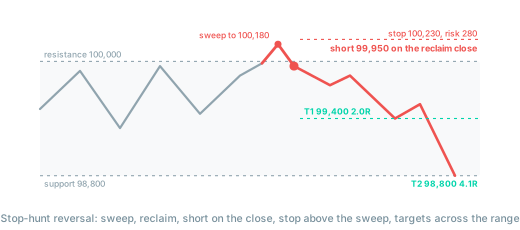
The stop is the number to notice. It is $280 away, which on BTC intraday is not tight, and it is $50 above the sweep high rather than $5 above it. That buffer costs position size (0.357 BTC instead of 0.54 BTC with a $185 stop) and buys protection from the most common failure of this trade, the second sweep, described below. The fee ratio is comfortable: 0.04% ÷ 0.28% = 14% of risk, half of the range fade lesson's danger line.
Target 1 at 2R is the trade's payday. A sweep that reverses usually travels at least to the middle of the range, because that is where the trapped longs give up and where the stops of the last hour's dip buyers sit. Target 2 is the other edge; it is hit less often, and when it is hit it often comes with a sweep of its own, which is why the range lessons put the second target just inside the far boundary rather than beyond it.
Three ways to enter
Every setup can be entered early, on time, or late, and the trade-off is always the same: earlier means a better price and less certainty. Vadym Graifer and Christopher Schumacher, in their book on tape reading, lay this out as aggressive, regular and conservative entries; the stop-hunt reversal is the clearest case of it.
| Entry style | Where | Price | Certainty | Stop |
|---|---|---|---|---|
| Aggressive | Limit order at the level ($100,000) as price falls back through it | Best, $50 better than the regular entry | Lowest: the reclaim candle has not closed yet | Same, $100,230 |
| Regular | Close of the reclaim candle ($99,950) | Good | The reclaim is confirmed | $100,230 |
| Conservative | The next candle, after a lower high forms below the level ($99,900 or worse) | Worst | Highest: the level has been retested from below and held | Can tighten to just above the lower high, $100,120 |
The regular entry is the one in the table above and the one to learn first. The aggressive entry adds about 0.2R to every winner and turns some winners into losers, because part of the time the "reclaim" is the middle of a breakout candle that closes above the level. The conservative entry gives up about 0.2R and lets you tighten the stop, which raises the R on the targets. Which one suits you is a question for your playbook records, not for opinion: track all three for fifty trades and the numbers will choose.
Managing the trade
- Half off at target 1. The middle of the range is the high-probability part of the move. Taking half there means that the trade is a winner even if the second half is stopped at breakeven, which happens.
- Move the stop, but not to entry. After target 1, bring the stop down to just above the level, $100,050. That still leaves room for a retest of the level from below, which is normal. A stop moved to the entry price gets hit by that retest and turns a 2R winner into a 1R winner; Kevin Davey makes this point about breakeven stops in his book on building trading systems, and the exit strategy lesson works through the numbers.
- Target 2 or a trail, decided in advance. Either the second half exits at $98,800 or it trails behind the 5-minute swing highs on the way down. Both are fine; switching between them mid-trade is not.
- Time limit. A reversal that has fuel moves within a few candles. If price is still within $100 of the entry after ten 1-minute candles, the trapped longs are not selling, which means they are not as trapped as the chart suggested. Exit flat and wait for the next setup.
What open interest can and cannot tell you
The old version of this idea was "if OI spikes on the breakout, a whale is opening a short at the top". That is not what OI measures. Every contract has a long and a short, so a rise in open interest on the spike means new positions were opened on both sides: someone bought the breakout and someone sold to them. The OI does not say which side was aggressive, and it does not say who is trapped. The reclaim says that.
What OI adds, once the reclaim has happened, is an estimate of the fuel:
- OI rose through the spike and price reclaimed the level. New longs were opened above $100,000 and are now under water. They are the sellers who will drive the move to target 1. This is the better version of the setup.
- OI fell through the spike. The buying above the level was mostly shorts closing (stops and liquidations close positions, which reduces OI), and few new longs were opened. The reversal has less fuel; take target 1 and do not expect target 2.
- OI flat. Mixed; the reclaim still stands, the trade is still valid, the size is normal.
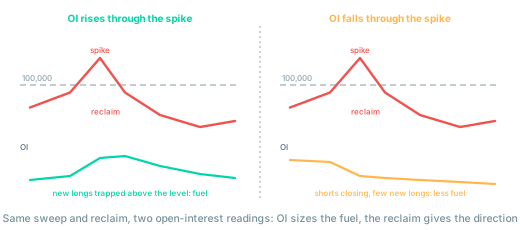
Aggressor volume, the CVD or footprint data covered in lesson 15, tells you the side that OI cannot: heavy market buying on the spike with no price progress means the buying was absorbed by passive sellers above the level, which is the signature of a sweep. Use OI as a tie-breaker for size, never as the trigger.
How the trade fails
The reclaim fails. Price closes back inside, you short, and the next candle goes straight back above $100,000 and holds. This is a breakout that paused for one candle. You are stopped at $100,230 for −1R. It happens, it is the cost of the setup, and the correct response is to consider the range breakout rules, not to short again at $100,100.
The second sweep. Price reclaims the level, you short, and before it falls, it spikes once more, to $100,210, and then reverses for real. A stop at $100,190 would have been hit; the $100,230 stop survives. A second sweep is common because the first one did not empty the whole band; the traders whose stops were at $100,200 and $100,250 are still there. This is why the buffer above the sweep high is worth its cost in position size, and why the aggressive entry's tighter stop loses more often than its better price suggests.
The slow grind. Price reclaims the level but instead of snapping down it drifts sideways just below it for twenty minutes. The trapped longs are not capitulating and the sellers are not pressing. Sweeps that reverse slowly often become the top of a new, higher range rather than a collapse to the old range low. The time limit above takes you out flat; without it, the trade sits there absorbing fees and attention until a breakout finally resolves it, in either direction.
The trapped long is you. The mirror of this trade is the trader who bought the spike at $100,150, watched the reclaim, and decided to hold because "it will come back". Then they added at $99,900 to average down. Then at $99,600. The reversal to target 1 that pays the short is the same move that liquidates the average-downer, and the mistakes lesson explains why adding to a trapped position is the most expensive habit in leveraged trading. Reading this pattern from the short side is the best way to stop being on its long side.
Checklist before a stop-hunt reversal
- Was there a sweep by the previous lesson's checklist: obvious level, volume burst, close back inside?
- Is the entry the close of the reclaim candle, or one of the other two styles chosen in advance?
- Is the stop above the sweep high with a buffer of at least 0.05% of price, and is it 1R or less?
- Is target 1 at the middle of the range, at least 2R, on half the position?
- Has the stop after target 1 been decided: just above the level, not at entry?
- Did OI rise or fall through the spike, and has that changed the size or the target 2 plan?
- What is the time limit, and will I honour it?
Where to go from here
The reversal trades a pierce that fails. The next lesson trades a pierce that succeeds: entering a breakout on momentum rather than waiting for the retest, with the confirmation rules that keep you out of the sweeps you have just learned to recognise.
- Range breakout: momentum entry, confirmation, the stop back inside the range.
Related guides:
- Stop hunts and liquidity sweeps: the mechanism and the recognition checklist.
- Breakout and retest: what a failed reversal often turns into.
- Open interest: what OI measures and why it counts both sides.
- Trade exit strategy: breakeven stops, trailing and partial exits compared on one trade.
- Position sizing and risk management: why the buffer above the sweep costs size, and why it is worth it.
- Crypto scalping strategies: the full strategies track.
- Glossary: liquidity sweep, open interest, risk/reward ratio.
This article is educational content, not investment advice. Trading derivatives carries substantial risk, including total loss of capital. See disclaimer.